Overview
It allows your customers to make payments using the debit or credit cards saved in their Google Account. By using Google Pay, customers enjoy a simpler, faster, and more secure checkout experience, whether they are purchasing from a mobile device or the web.
How it Works
When a customer chooses Google Pay at checkout, they will see a list of their saved cards. They can then select a card and complete the payment using the chosen card.
Google Pay™ Enablement
To enable Google Pay for your store, please contact our Operations team at operation@sslwireless.com. Once enabled, the Google Pay button will appear under the card section of the SSLCommerz checkout page.
If you want to integrate Google Pay on your checkout page, the necessary Google Pay data required to load the Google Pay button and process payments will be available from the APIs provided in the response of the initiate transaction API of the below Integration Guide section.
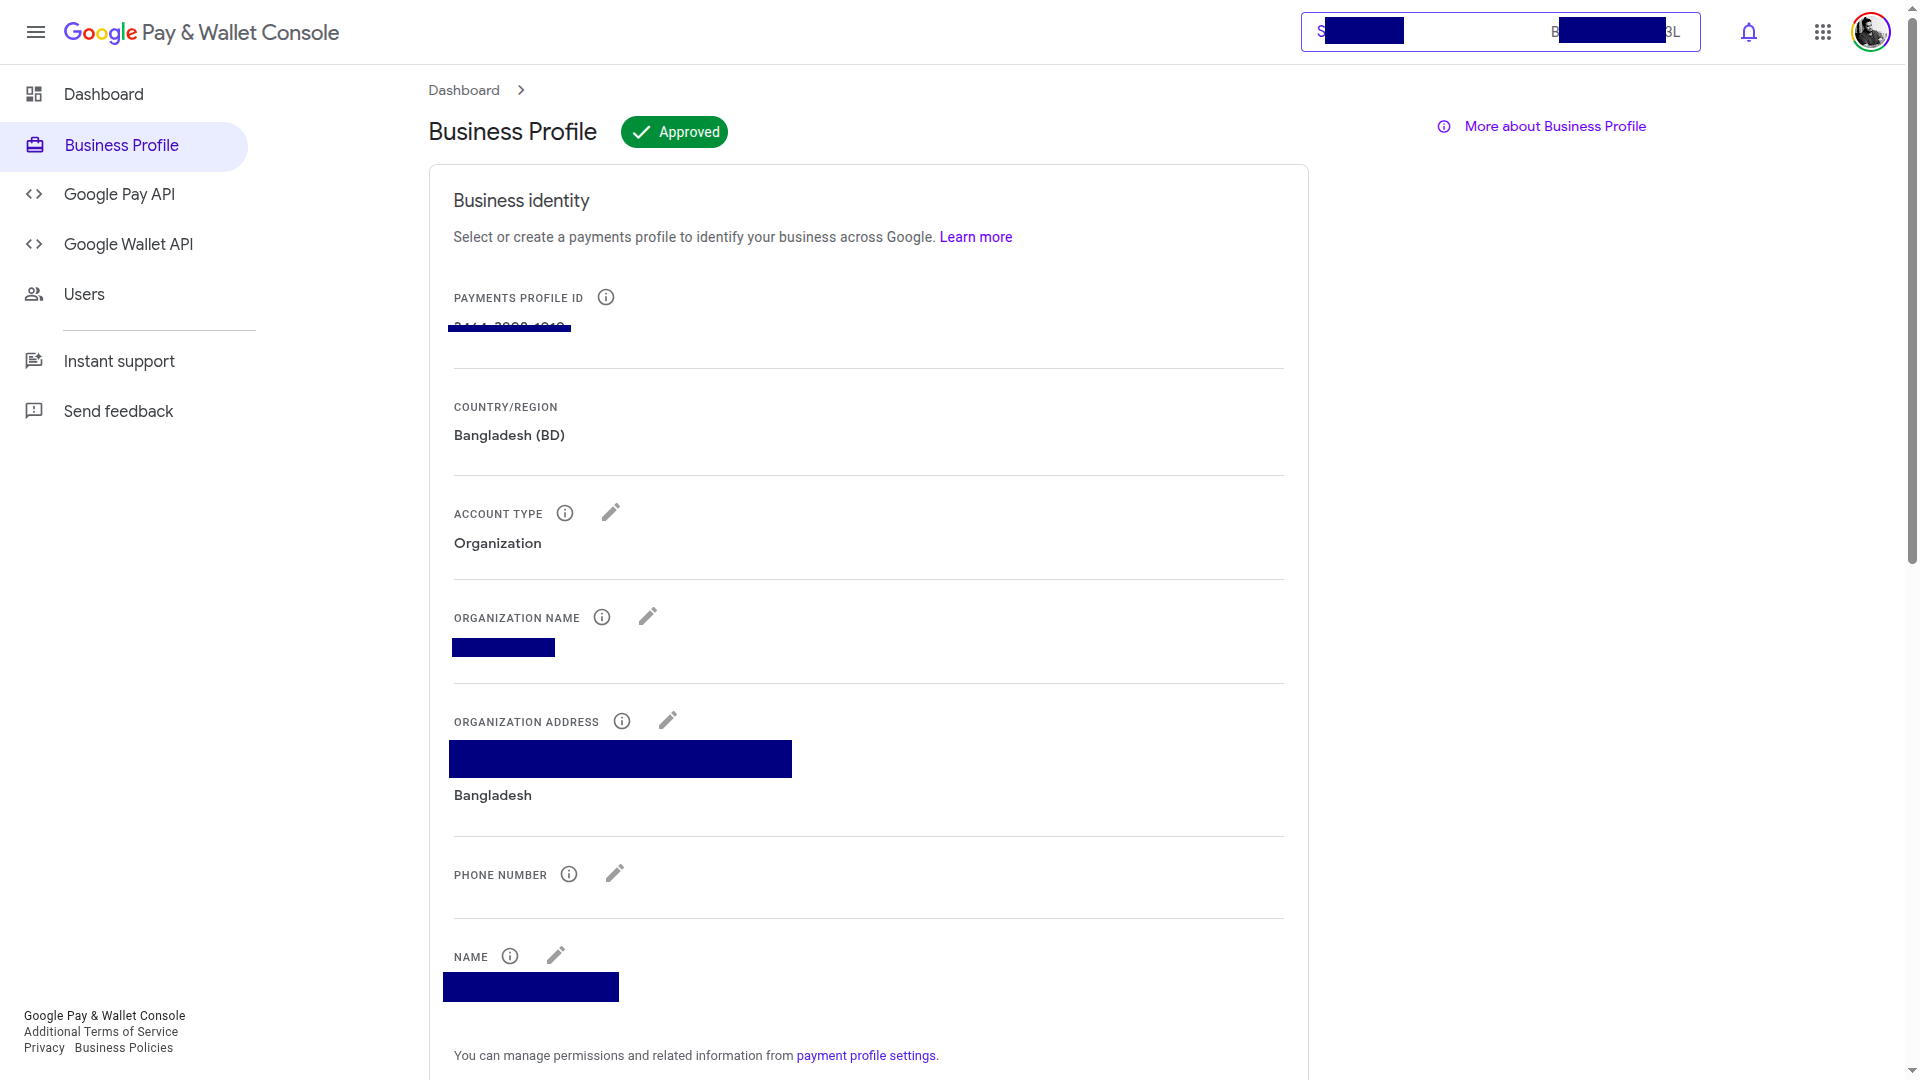
Enable Google Pay and Wallet Console
To get the Google Pay button working on your website or Android App, you need to follow a few simple steps. Follow the Steps Below:
Step 1: Enable the Google Pay and Wallet Console
First, you must enable this feature to activate the Google Pay Button from here.
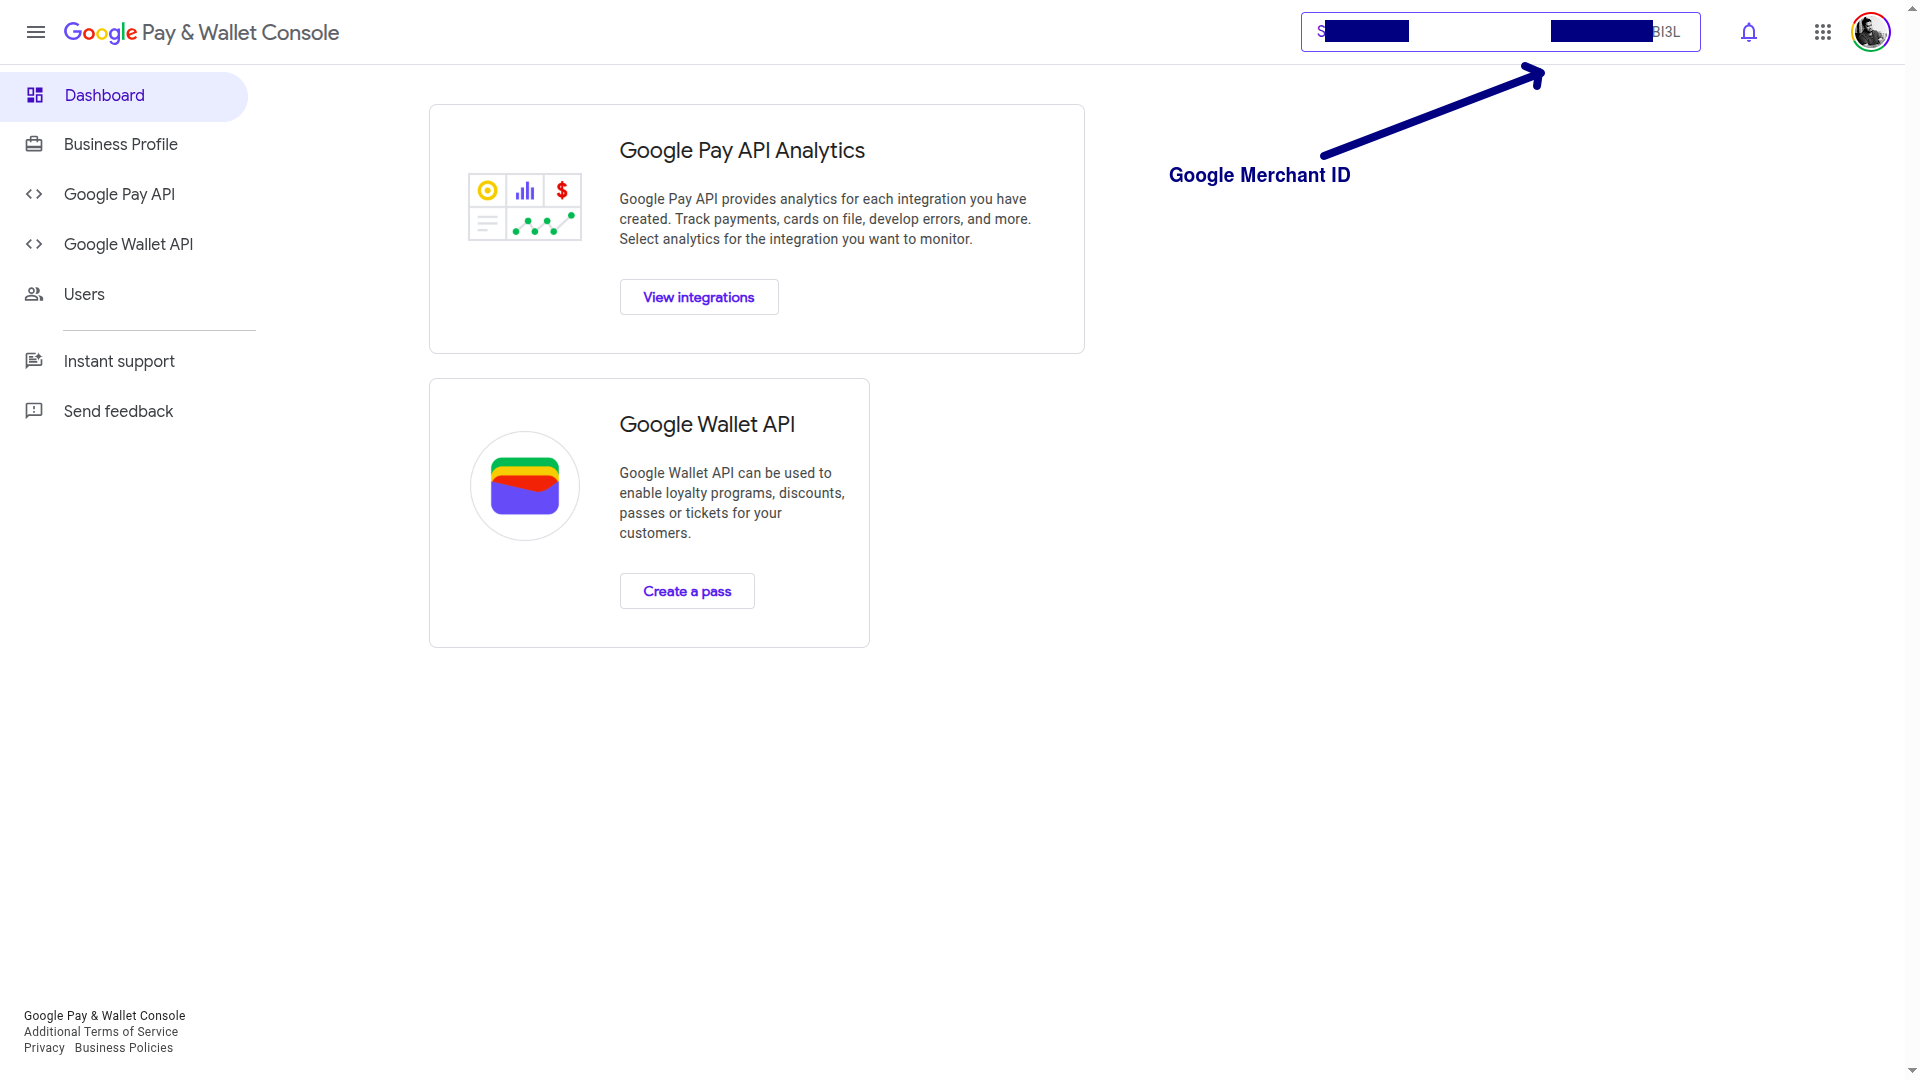
Step 2: Share Your Google Merchant ID
Provide your Google Merchant ID to our Operations Team. They'll use it to configure the button for you, and you'll receive it in the initiateTransaction API response.
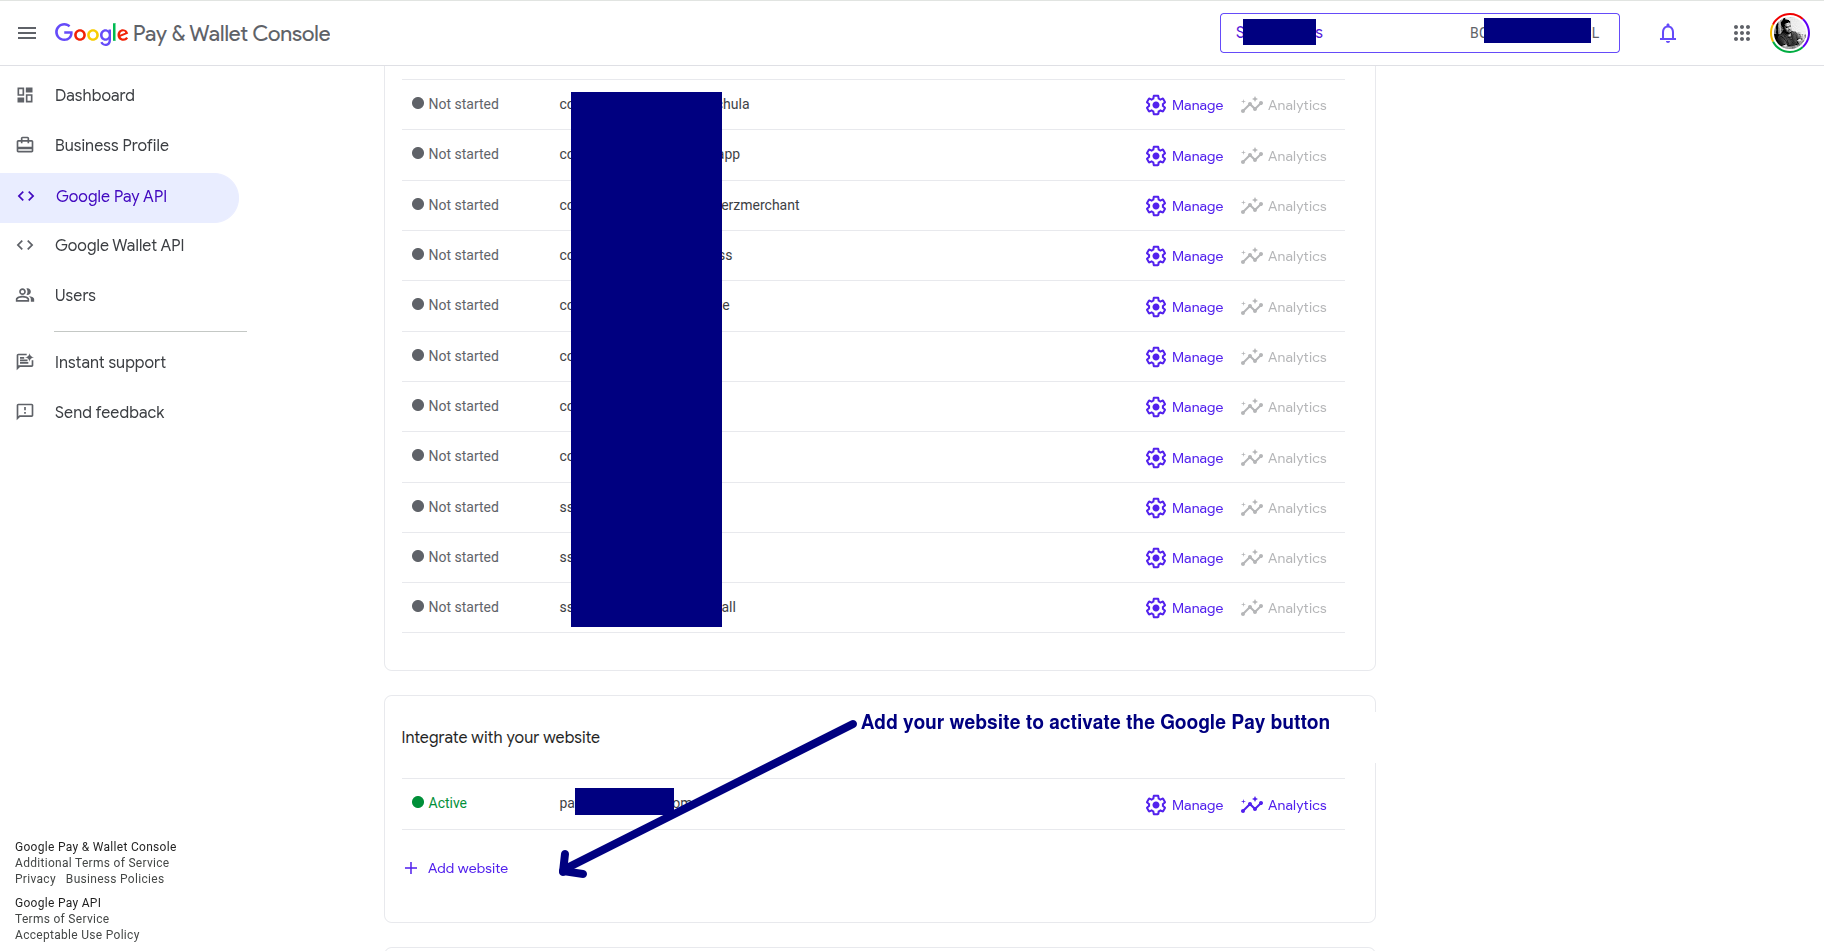
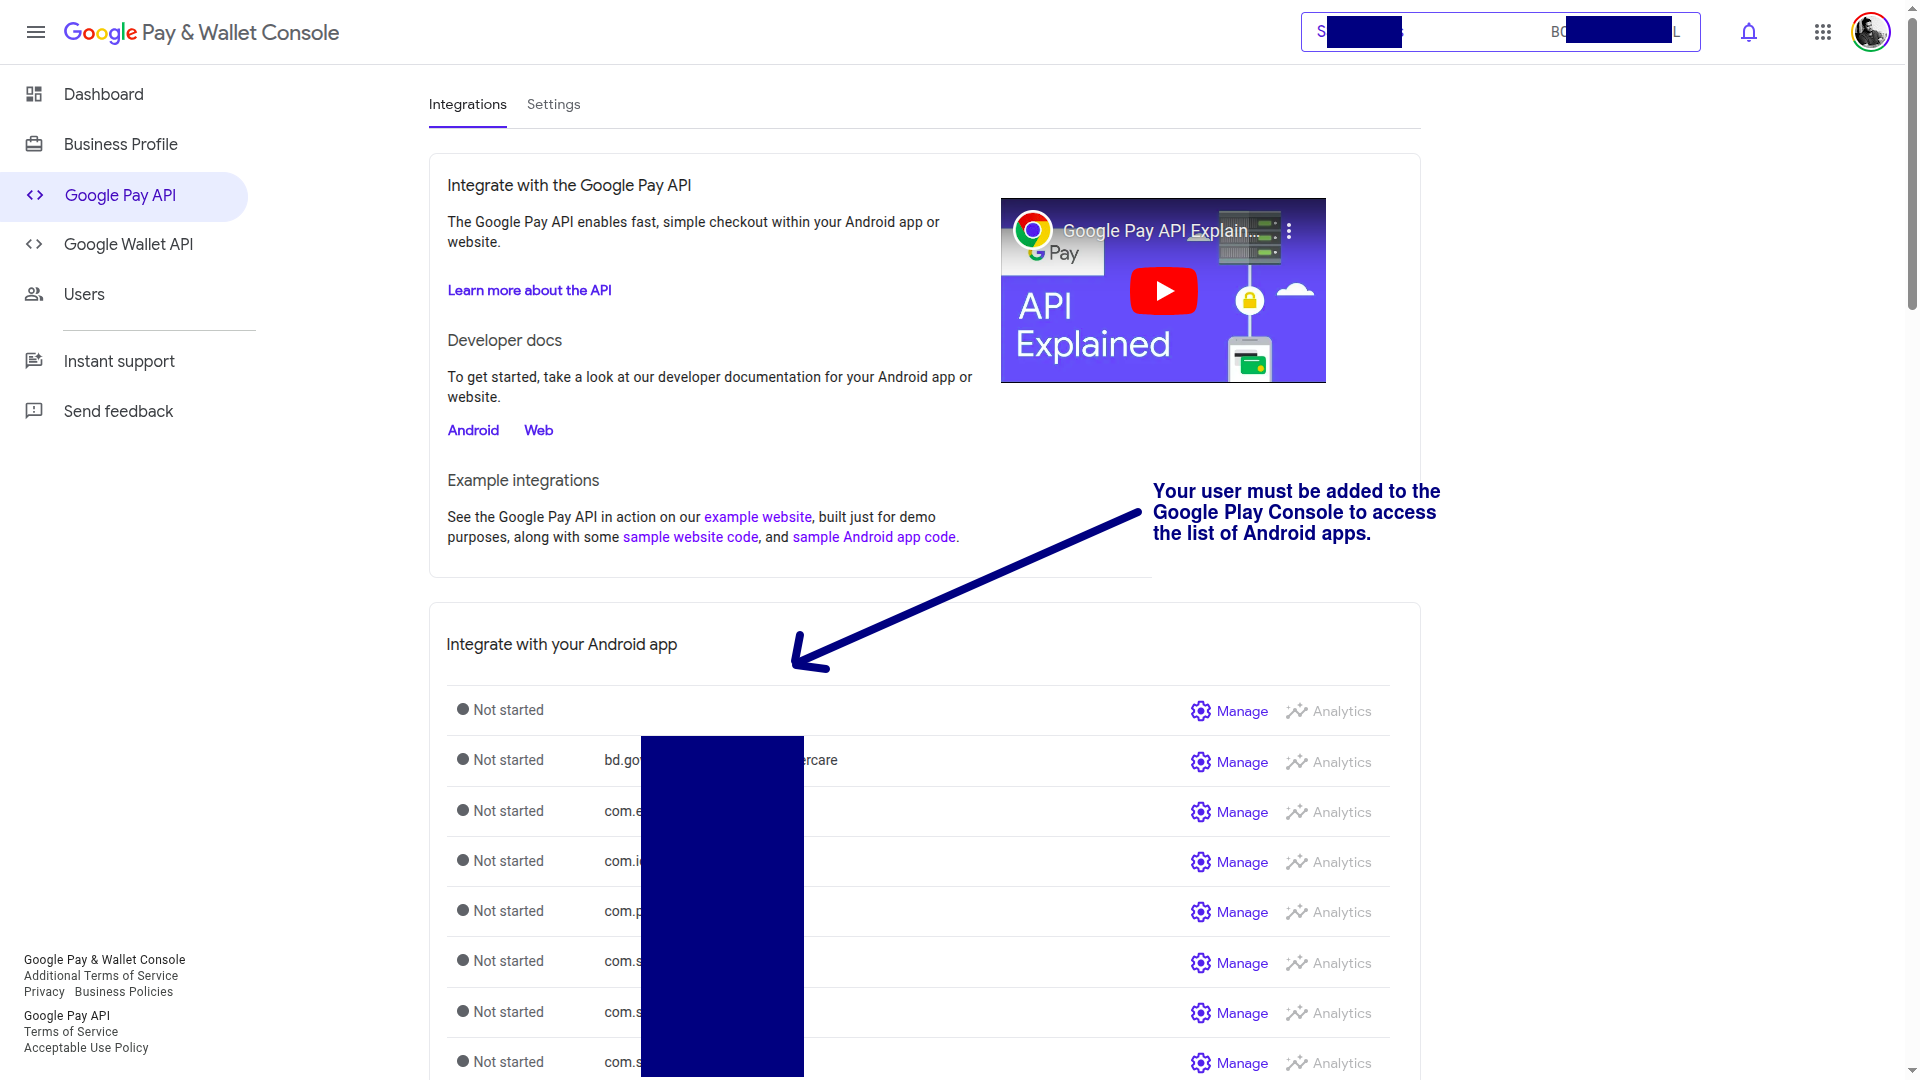
Step 3: Allow Google Pay to Load for Android app or Website
Allow your Android app or website to load Google Pay, otherwise Google Pay will show an error pop-up.
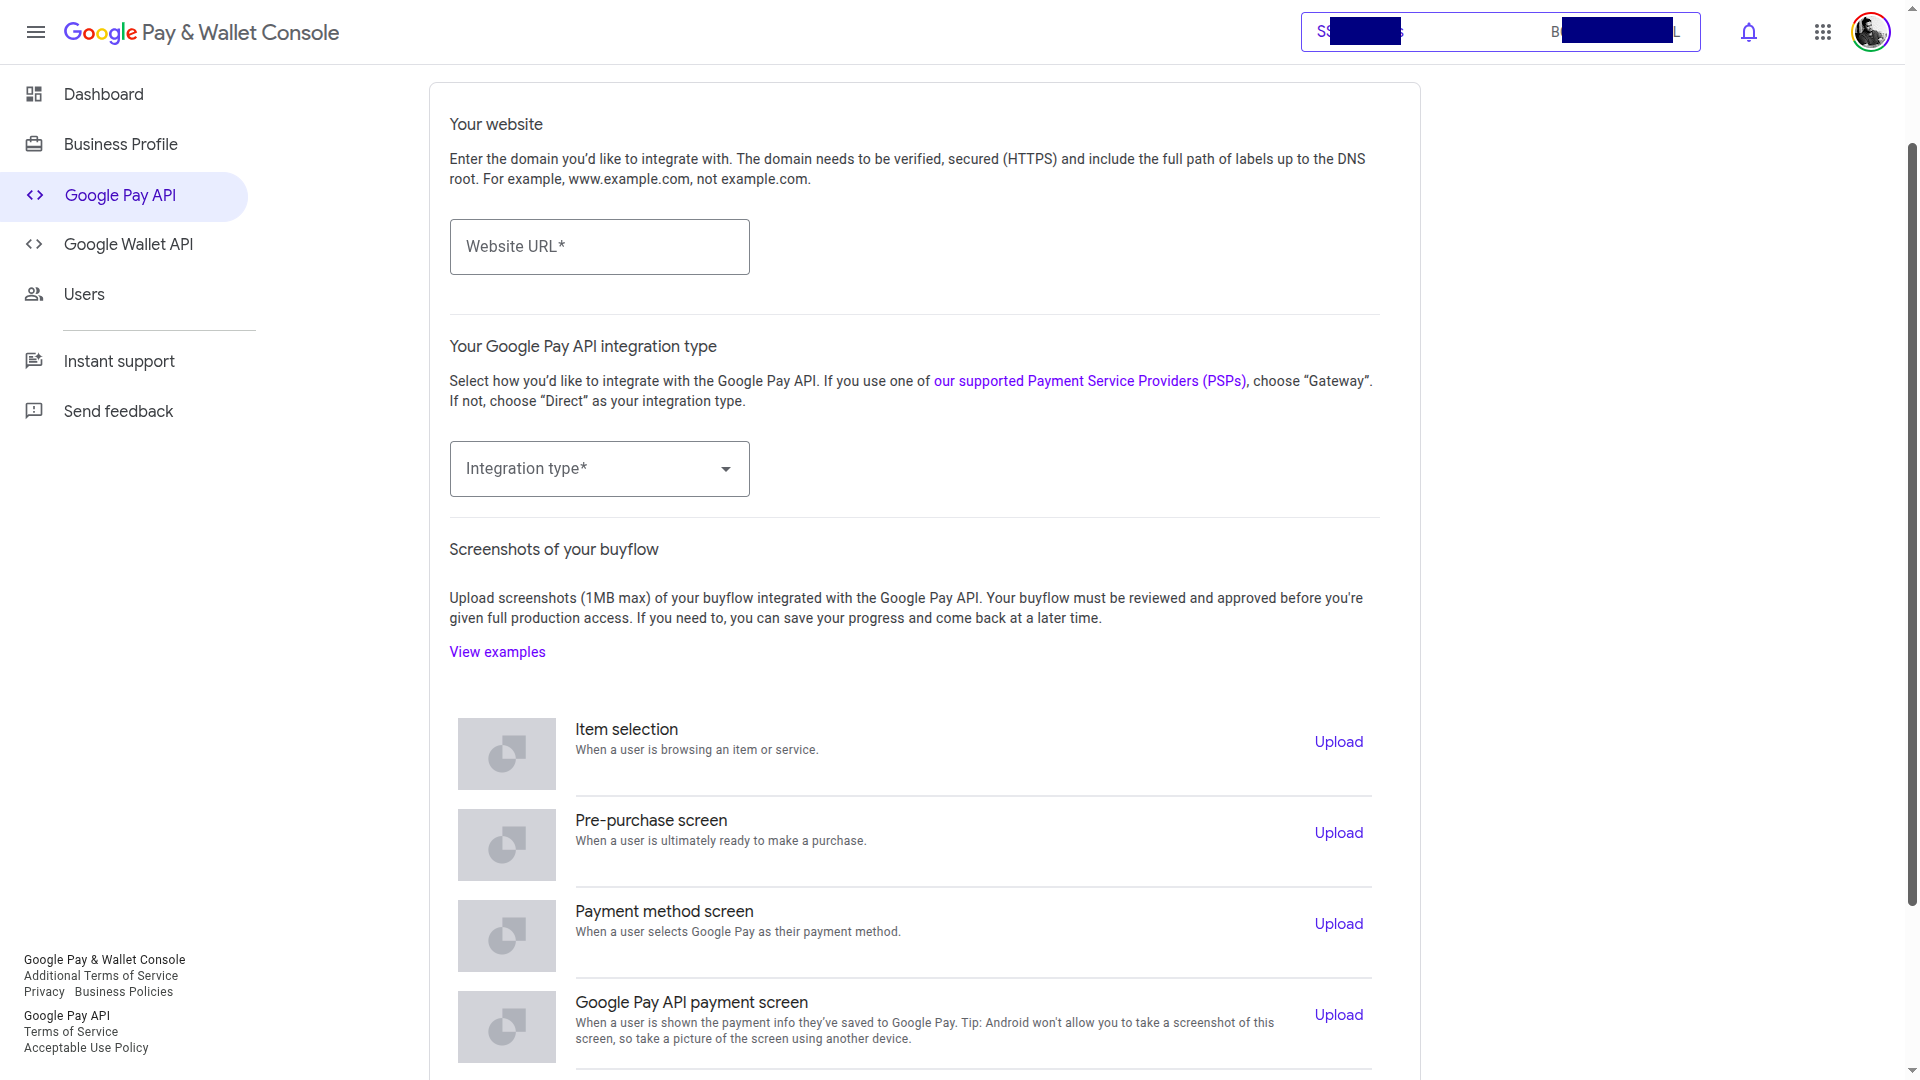
All merchants must adhere to the Google Pay APIs Acceptable Use Policy and accept the terms that the Google Pay API Terms of Service defines.
Integration Guide
Easily add Google Pay to your checkout flow using the Merchant Hosted Payment API from SSLCommerz. This guide walks you through the integration in 3 simple steps.
🚀 Quick Start
🏗️ Architecture Flow
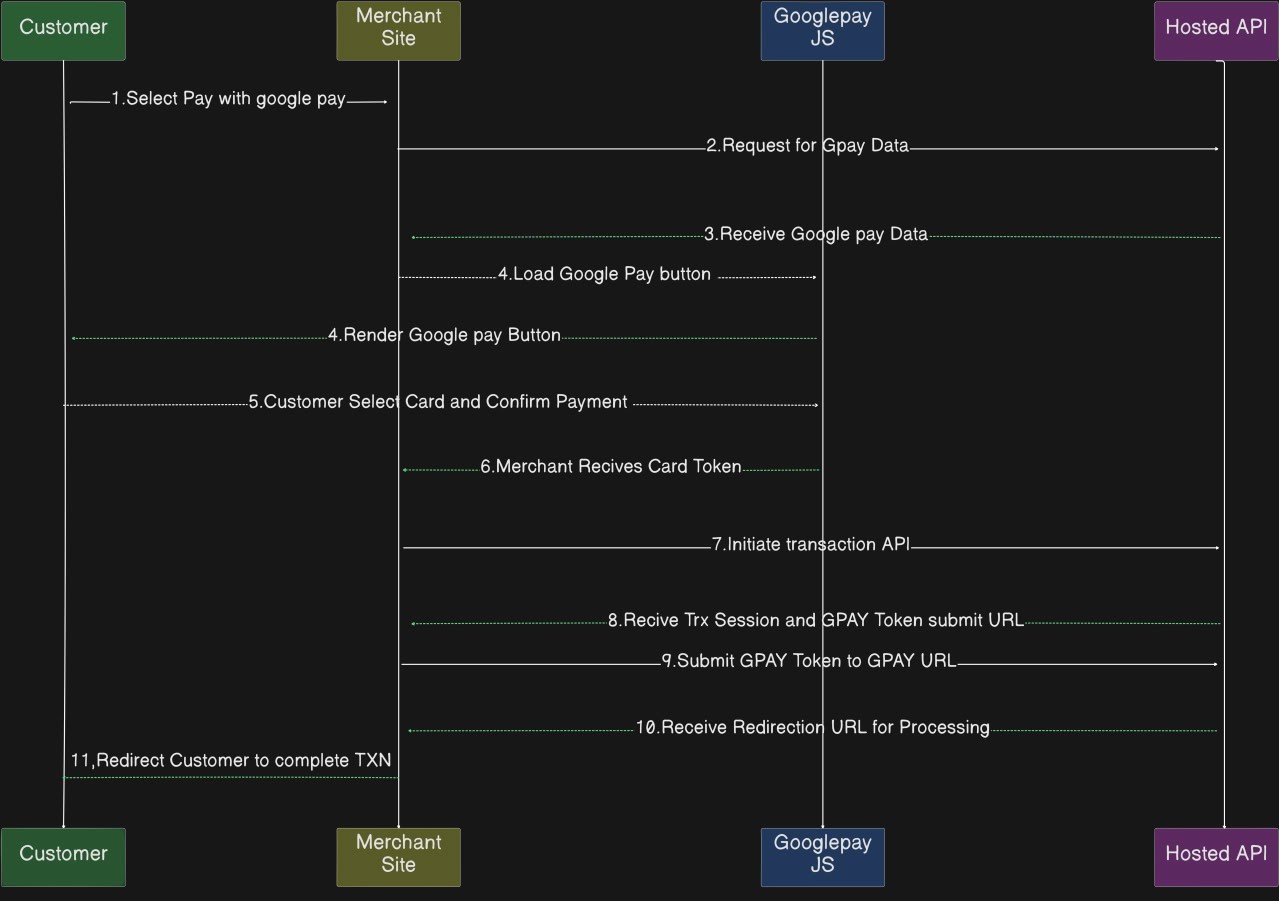
Process Overview
Here's how the complete Google Pay integration process works from start to finish.
Load Google Pay Button
Request and receive Google Pay(GPay) data from the SSLCommerz GPay API if your store is enabled for GPay. The GPay API has a daily limit of three requests. Cache the GPay data for recurrent use and refresh it as needed, up to the daily limit.
The Merchant Site uses the Google Pay JS SDK to load the Google Pay button using the GPAY data received.
Customer selects Google Pay
On the Merchant Site, the customer clicks on Pay with Google Pay.
GPay Provides Payment Token
The Customer selects a saved card in Google Pay. The Google Pay JS returns a Google Pay token to the Merchant Site.
Initiate Transaction API
The Merchant Site calls the Hosted API to initiate the transaction. Request includes merchant credentials, order details, and customer information.
A response is sent back with Google Pay data if it’s enabled for your store. The Google pay data provides Session Key for Googlepay Transaction and Google Pay token submit URL
Submit Google Pay Token for Processing
The Merchant Site sends the Google Pay token + Session Key to the Hosted API.
The API response indicates either SUCCESS or FAIL. Upon a successful request, the API returns a redirection URL. An unsuccessful attempt results in a FAILED status.
Redirect Customer to Transaction Redirection URL
Customer is either redirected to 3DS' OTP page for completing Payment or for direct payment processing if 3DS not required for Authentication.
Final Redirection
Once the payment is processed, the Customer is redirected back to the Merchant Site via Success, Fail, or Cancel URL.
Important Note
Finally, an IPN (Instant Payment Notification) will be sent for server-to-server notification after a successful transaction to ensure reliability. To ensure reliability, always set ipn_url during the initiate transaction API. SSLCommerz will POST transaction status to this endpoint. This helps to reconcile backend transactions even if the user closes the browser.
Step 1: Receive Google Pay Data
Endpoint:
Request Parameters:
| Parameter Name | Data Type | Required | Description |
|---|---|---|---|
action |
String | Yes | Action name: googlepayConfig |
store_id |
String (30) | Yes | Your SSLCOMMERZ Store ID is the integration credential which can be collected through our managers |
store_passwd |
String (30) | Yes | Your SSLCOMMERZ Store Password is the integration credential which can be collected through our managers |
Response Parameters:
| Parameter Name | Type | Description |
|---|---|---|
APIConnect |
String | Status of API Connection. Example: Success/INVALID_REQUEST |
status_code |
Numeric | HTTP code of response |
status_sub_code |
Numeric | Sub HTTP code of response |
failed_reason |
Json | Describes reason for failing |
data |
Json | Response data |
Example Request:
{
  "action": "googlepayConfig",
  "store_id": "demotest",
  "store_passwd": "qwerty",
}
Example Response:
{
  "APIConnect": "SUCCESS",
  "status_code": 200,
  "data": {
    "apiVersion": "2",
    "apiVersionMinor": "0",
    "gatewayMerchantId": "googletest2",
    "gateway": "sslcommerz",
    "merchantId": "01234567890123456789",
    "merchantName": "Example Merchant",
    "allowedAuthMethods": "PAN_ONLY,CRYPTOGRAM_3DS",
    "allowedCardNetworks": "MASTERCARD,VISA"
  }
}
Step 2: Render Google Pay Button
Add the Google Pay JS:
<script async src="https://pay.google.com/gp/p/js/pay.js"></script>
<div id="container"></div>Use the params from transaction initiation response:
- Once you have received the Google Pay parameters in the Google Pay config API response in step-1, you must configure the Google Pay JS script with those values.
Required Parameters
- From the initiate transaction response, use the following values under
googlepay: gatewaygatewayMerchantIdmerchantIdmerchantName
Authentication Methods
- Set the following values for
allowedAuthMethods: "PAN_ONLY"→ Enables 3D Secure (3DS) transactions. Customers will need to enter an OTP to authenticate."CRYPTOGRAM_3DS"→ Used for Tap & Pay feature.
Supported Card Networks
- Currently, the following card networks are supported for Google Pay via SSLCommerz:
"MASTERCARD""VISA"
Example JavaScript Configuration:
function onGooglePayLoaded() {
  const paymentsClient = new google.payments.api.PaymentsClient({
    environment: 'TEST'
  });

  const paymentDataRequest = {
    apiVersion: 2,
    apiVersionMinor: 0,
    allowedPaymentMethods: [{
      type: 'CARD',
      parameters: {
        allowedAuthMethods: ["PAN_ONLY", "CRYPTOGRAM_3DS"],
        allowedCardNetworks: ["MASTERCARD", "VISA"]
      },
      tokenizationSpecification: {
        type: 'PAYMENT_GATEWAY',
        parameters: {
          gateway: <set-gateway>, // from API response
          gatewayMerchantId: <set-gatewayMerchantId> // from API response
        }
      }
    }],
    merchantInfo: {
      merchantId: <set-merchantId>, // from API response
      merchantName: <set-merchantName> // from API response
    },
    transactionInfo: {
      totalPriceStatus: 'FINAL',
      totalPrice: '100.00',
      currencyCode: 'BDT',
      countryCode: 'BD'
    }
  };

  const button = paymentsClient.createButton({
    onClick: () => {
      paymentsClient.loadPaymentData(paymentDataRequest)
      .then(paymentData => {
        // send token to step 3 for processing
        token = paymentData.paymentMethodData.tokenizationData.token;
      });
    }
  });

  document.getElementById('container').appendChild(button);
}Step 3: Initiate Transaction
Endpoint:
Request Parameters:
| Parameter Name | Data Type | Required | Description | ||||||||||||
|---|---|---|---|---|---|---|---|---|---|---|---|---|---|---|---|
action |
String | Yes | Action name: initiateTransaction |
||||||||||||
store_id |
String (30) | Yes | Your SSLCOMMERZ Store ID is the integration credential which can be collected through our managers | ||||||||||||
store_passwd |
String (30) | Yes | Your SSLCOMMERZ Store Password is the integration credential which can be collected through our managers | ||||||||||||
user_refer |
String (256) (Encrypted Format) |
Conditional |
Required if enable_cus_googlepay parameter is not set to 1 Minimum Length is 20 characters. All the token of the card will be generated against this user_refer. Each user_refer id will represent an individual user of your system. So, all the transactions of same user, then must provide the same user_refer. The value must be encrypted format. Algorithm is AES-256-CBC. Here, SSLCOMMERZ will provide Salt Key to do encryption.
user_refer will contain JSON format data with two parameters:
Example: |
||||||||||||
total_amount |
decimal (10,2) | Yes | The amount which will process by SSLCOMMERZ. It shall be decimal value (10,2). Example: 55.40. The transaction amount must be from 10.00 BDT to 500000.00 BDT | ||||||||||||
currency |
string (3) | Yes | The currency type must be mentioned. It shall be three characters. Example: BDT, USD, EUR, SGD, INR, MYR, etc. If the transaction currency is not BDT, then it will be converted to BDT based on the current convert rate. Example: 1 USD = 82.22 BDT. | ||||||||||||
tran_id |
string (30) | Yes | Unique transaction ID to identify your order in both your end and SSLCOMMERZ | ||||||||||||
success_url |
string (255) | Yes | It is the callback URL of your website where user will redirect after successful payment (Length: 255) | ||||||||||||
fail_url |
string (255) | Yes | It is the callback URL of your website where user will redirect after any failure occur during payment (Length: 255) | ||||||||||||
cancel_url |
string (255) | Yes | It is the callback URL of your website where user will redirect if user canceled the transaction (Length: 255) | ||||||||||||
ipn_url |
string (255) | No | Important! Not mandatory, however better to use to avoid missing any payment notification - It is the Instant Payment Notification (IPN) URL of your website where SSLCOMMERZ will send the transaction's status (Length: 255). The data will be communicated as SSLCOMMERZ Server to your Server. So, customer session will not work. IPN is very important feature to integrate with your site(s). Some transaction could be pending or customer lost his/her session, in such cases back-end IPN plays a very important role to update your backend office. | ||||||||||||
cus_name |
string (50) | Yes | Your customer name to address the customer in payment receipt email | ||||||||||||
cus_email |
string (50) | Yes | Valid email address of your customer to send payment receipt from SSLCOMMERZ end | ||||||||||||
cus_add1 |
string (50) | Yes | Address of your customer. Not mandatory but useful if provided | ||||||||||||
cus_add2 |
string (50) | No | Address line 2 of your customer. Not mandatory but useful if provided | ||||||||||||
cus_city |
string (50) | Yes | City of your customer. Not mandatory but useful if provided | ||||||||||||
cus_postcode |
string (30) | Yes | Postcode of your customer. Not mandatory but useful if provided | ||||||||||||
cus_country |
string (50) | Yes | Country of your customer. Not mandatory but useful if provided | ||||||||||||
cus_phone |
string (50) | Yes | The phone/mobile number of your customer to contact if any issue arises | ||||||||||||
cus_state |
string (20) | No | State of your customer. Not mandatory but useful if provided | ||||||||||||
cus_fax |
string (20) | No | Fax number of your customer. Not mandatory but useful if provided | ||||||||||||
shipping_method |
string (50) | Yes | Shipping method of the order. Example: YES or NO or Courier | ||||||||||||
num_of_item |
integer (1) | No | No of product will be shipped. Example: 1 or 2 or etc | ||||||||||||
ship_name |
string (50) | Conditional | Mandatory, if shipping_method is YES - Shipping Address of your order. Not mandatory but useful if provided | ||||||||||||
ship_add1 |
string (50) | Conditional | Mandatory, if shipping_method is YES - Additional Shipping Address of your order. Not mandatory but useful if provided | ||||||||||||
ship_add2 |
string (50) | No | Additional Shipping Address of your order. Not mandatory but useful if provided | ||||||||||||
ship_city |
string (50) | Conditional | Mandatory, if shipping_method is YES - Shipping city of your order. Not mandatory but useful if provided | ||||||||||||
ship_state |
string (50) | No | Shipping state of your order. Not mandatory but useful if provided | ||||||||||||
ship_postcode |
string (50) | Conditional | Mandatory, if shipping_method is YES - Shipping postcode of your order. Not mandatory but useful if provided | ||||||||||||
ship_country |
string (50) | Conditional | Mandatory, if shipping_method is YES - Shipping country of your order. Not mandatory but useful if provided | ||||||||||||
product_name |
string (255) | Yes | Mention the product name briefly. Mention the product name by coma separate. Example: Computer,Speaker | ||||||||||||
product_category |
string (100) | Yes | Mention the product category. Example: Electronic or topup or bus ticket or air ticket | ||||||||||||
product_profile |
string (100) | Yes |
Mention goods vertical. It is very much necessary for online transactions to avoid chargeback. Please use the below keys:
|
||||||||||||
product_type |
string (30) | Conditional | Mandatory, if product_profile is telecom-vertical - For mobile or any recharge, this information is necessary. Example: Prepaid or Postpaid | ||||||||||||
topup_number |
string (150) | Conditional | Mandatory, if product_profile is telecom-vertical - Provide the mobile number which will be recharged. Example: 8801700000000 or 8801700000000,8801900000000 | ||||||||||||
country_topup |
string (30) | Conditional | Mandatory, if product_profile is telecom-vertical - Provide the country name in where the service is given. Example: Bangladesh | ||||||||||||
cart |
json | No |
JSON data with two elements. product: Max 255 characters, quantity: Quantity in numeric value and amount: Decimal (12,2) Example: |
||||||||||||
product_amount |
decimal (10,2) | No | Product price which will be displayed in your merchant panel and will help you to reconcile the transaction. It shall be decimal value (10,2). Example: 50.40 | ||||||||||||
vat |
decimal (10,2) | No | The VAT included on the product price which will be displayed in your merchant panel and will help you to reconcile the transaction. It shall be decimal value (10,2). Example: 4.00 | ||||||||||||
discount_amount |
decimal (10,2) | No | Discount given on the invoice which will be displayed in your merchant panel and will help you to reconcile the transaction. It shall be decimal value (10,2). Example: 2.00 | ||||||||||||
convenience_fee |
decimal (10,2) | No | Any convenience fee imposed on the invoice which will be displayed in your merchant panel and will help you to reconcile the transaction. It shall be decimal value (10,2). Example: 3.00 | ||||||||||||
value_a |
string (255) | No | Extra parameter to pass your meta data if it is needed. Not mandatory | ||||||||||||
value_b |
string (255) | No | Extra parameter to pass your meta data if it is needed. Not mandatory | ||||||||||||
value_c |
string (255) | No | Extra parameter to pass your meta data if it is needed. Not mandatory | ||||||||||||
value_d |
string (255) | No | Extra parameter to pass your meta data if it is needed. Not mandatory | ||||||||||||
disallowed_bin |
String | No | Comma separated. Example: 525680,534273,530505 | ||||||||||||
disallowed_bin_msg |
String | No | Message for disallowed bin. Example: Please use other banks cards to pay your LankaBangla credit card bills | ||||||||||||
allowed_bin |
string (255) | No | Do not Use! If you do not control on transaction - You can provide the BIN of card to allow the transaction must be completed by this BIN. You can declare by coma ',' separate of these BIN. Example: 371598,371599,376947,376948,376949 | ||||||||||||
allowed_bin_msg |
String | No | Message for allowed bin. Example: Please use bank cards to pay your recharge bill | ||||||||||||
enable_cus_googlepay |
Boolean | No | If you want to show the Google Pay button during customer checkout, set the value to 1. It will also make the user_refer param optional. |
Response Parameters:
| Parameter Name | Type | Description |
|---|---|---|
APIConnect |
String | Status of API Connection. Example: Success/INVALID_REQUEST |
status_code |
Numeric | HTTP code of response |
status_sub_code |
Numeric | Sub HTTP code of response |
failed_reason |
Json | Describes reason for failing |
data |
Json | Response data |
Example Request:
{
  "action": "initiateTransaction",
  "store_id": "demotest",
  "store_passwd": "qwerty",
  "user_refer": "Ju+OrMEn9UUMb3goE/AVqHx8fEZhUjBSazFaejdQRjFIRlp2RGgzaCtvbFgrQ0kyejh0YWZxeXlkMHROZ2c2OTFSSkVjNHFnQVRGd2tPSkZib0E4elZSTXdraGxYem53bFh2YThxTCtaUVBQbDVsRmdaV2kzZGdveENsNkY4PQ==",
  "total_amount": "10",
  "currency": "BDT",
  "tran_id": "8r09q73x496T823OI49",
  "success_url": "https://sslcommerz.com",
  "fail_url": "https://sslcommerz.com",
  "cancel_url": "https://sslcommerz.com",
  "ipn_url": "https://sslcommerz.com",
  "cus_name": "Rana Poddar",
  "cus_email": "ran@poddar.com",
  "cus_add1": "27/A",
  "cus_city": "Dhaka",
  "cus_postcode": "1000",
  "cus_country": "Bangladesh",
  "cus_phone": "01912345678",
  "product_name": "Recharge",
  "product_profile": "non-physical-goods"
  "enable_cus_googlepay": 1
}
Example Response:
{
  "APIConnect": "SUCCESS",
  "status_code": 200,
  "data": {
    "sessionkey": "CA5B772D7E3553CB5B08A78068FF9E68",
    "redirectGatewayURL": "https://dev-epay-gw.sslcommerz.com/e02533...",
    "googlepay": {
        "totalPrice": "100.00",
        "currencyCode": "BDT",
        "countryCode": "BD",
        "session_key": "yw7yeoy39y293c236446612232343434"
        "actionurl": "https://epay.sslcommerz.com/yw7yeoy39y293c23...",
        }
    }
}
Step 4: Process Google Pay Token
Endpoint:
Request Parameters
| Parameter Name | Data Type | Required | Description |
|---|---|---|---|
| session_key | String | Yes | The session key received at the time of initiate the transaction |
| en_signature_data | String | Yes | The payload received from Google which need to encode by base64 |
Response Parameters
| Parameter Name | Type | Description |
|---|---|---|
| APIConnect | String | Status of API Connection. Example: Success/INVALID_REQUEST |
| status_code | Numeric | HTTP code of response |
| failed_reason | Json | Describes reason for failing |
| data | Json | Response data |
Example Request:
{
  "session_key": "yw7yeoy39y293c236446612232343434",
  "en_signature_data": "eyJzaWduYXR1cmUiOiJNRVVDSVF..."
}
Response Examples:
If 3DS Required (OTP):
{
  "status": "SUCCESS",
  "message": "Payment Redirection.",
  "data": {
    "type": "otp",
    "data": "<form action='...threeDs' ...>",
    "return_url": "https://merchant.com/payment/success"
  }
}
If 3DS Not Required:
{
  "status": "SUCCESS",
  "message": "Payment Redirection.",
  "data": {
    "type": "regular",
    "return_url": "https://merchant.com/payment/success"
  }
}
Finally, redirect the customer to the "return_url" to complete the transaction and display the success or failure status.
Finally, redirect the customer to the "return_url" to complete the transaction and display the success or failure status.
You have successfully integrated Google Pay with SSLCommerz. Your customers can now enjoy a seamless, secure, and fast payment experience using their saved Google Pay cards.